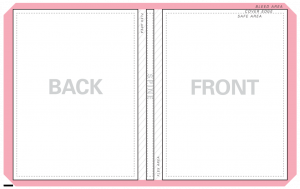
Hardcover Design Guidelines & Templates

7″ x 10″ PDF Templates
DO
- Use 300 DPI or High Resolution images
- Edit and save in CMYK
- Use Vector graphics
- Convert all text into Graphic Form/Outlines
- Illustrator & Indesign: Type>Create Outlines
DON’T
- Use graphics taken from websites
- Add print or crop marks
- Save as multi-page PDF
- Flatten layers before saving – it’ll reduce your print quality
Bleed Area
![]() Extend all colors and graphics to the full edge of the bleed area – it will make sure you don’t end up with white edges on your book cover when it is wrapped.
Extend all colors and graphics to the full edge of the bleed area – it will make sure you don’t end up with white edges on your book cover when it is wrapped.
Cover Edge
![]() This is the edge of the hardcover, where we aim to wrap the design. Your background still needs to run to the edges of the bleed area.
This is the edge of the hardcover, where we aim to wrap the design. Your background still needs to run to the edges of the bleed area.
Safe Area
![]() Keep all the key elements of your design, including text, logos, and iconography within the this area to insure it is not wrapped around the edge of your hardcover.
Keep all the key elements of your design, including text, logos, and iconography within the this area to insure it is not wrapped around the edge of your hardcover.
Flex Area
![]() This is the edge of the hardcover, where we aim to wrap the design. Your background still needs to run to the edges of the bleed area.
This is the edge of the hardcover, where we aim to wrap the design. Your background still needs to run to the edges of the bleed area.
Hardcover dimensions—8.5″x11″
| Total size in Inches | Total size in Pixels | Total size in Centimeters | |
| A spine | 19.25″ x 12.25″ | 5575px x 3675px | 48.9cm x 31.12cm |
| B spine | 19.4″ x 12.25″ | 5820px x 3675px | 49.28cm x 31.12cm |
| C spine | 19.65″ x 12.25″ | 5895px x 3675px | 49.91cm x 31.12cm |
| D spine | 19.9″ x 12.25″ | 5970px x 3675px | 50.55cm x 31.12cm |
| E spine | 20.15″ x 12.25″ | 6045px x 3675px | 51.18cm x 31.12cm |
Hardcover Page Count
| # of Pages | # of Sheets | Width in Inches | Width in mm | |
| A spine | 10—120 pages | 5—60 sheets | 0.25″ | 6.4mm |
| B spine | 120—220 pages | 60—110 sheets | 0.5″ | 12.7mm |
| C spine | 220—360 pages | 110—180 sheets | 0.75″ | 19.7mm |
| D spine | 360—470 pages | 180—235 sheets | 1″ | 25.4mm |
| E spine | 470—610 pages | 235—305 sheets | 1.25″ | 31.8mm |
Why file types do you recommend?
To help make your job easier, Powis accepts a wide range of file formats. These are: PDF, TIFF, PNG, JPEG.
For the best results, we recommend:
- PDF: This file format protects your graphics and enables us to get the best results whether your design includes, text, graphics and/or photography
- TIFF: This file format is known for its extremely high quality, and is primarily used in photography and desktop publishing. If you are working in Photoshop, you can Save-As into TIFF while maintaining your file’s layers.
Why 300 DPI?
Files such as JPEG, PNG, TIFF etc., are made up of a thousands of tiny ‘dots’ or ‘pixels’. These pixels are all the same size, but can be different colors. The amount of pixels or dots in an image is called ‘resolution’. When there are lots of pixels and an image looks smooth or photographic, that’s ‘high resolution’. When there are less pixels an image often looks blocky and bad.
For this reason, we ask for 300 DPI or ‘High Resolution’ graphics – these have a large number of pixels available and will look smooth & precise when printed.

