Image Ready Strip | Design Guidelines
Download Image Ready Templates
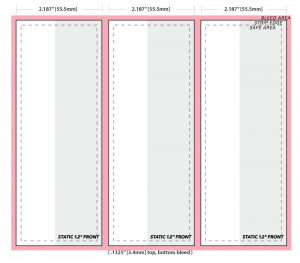
Bleed Area
![]() Extend all colors and graphics to the full edge of the bleed area – it will make sure you don’t end up with white edges on your binding strip.
Extend all colors and graphics to the full edge of the bleed area – it will make sure you don’t end up with white edges on your binding strip.
Strip Area
![]() This is the edge of the binding strip. Your background still needs to run to the edges of the bleed area.
This is the edge of the binding strip. Your background still needs to run to the edges of the bleed area.
Safe Area
![]() Keep all the key elements of your design, including text, logos, and iconography within the this area to insure important these design elements do not get cut off.
Keep all the key elements of your design, including text, logos, and iconography within the this area to insure important these design elements do not get cut off.
Static 1.2″ Front
![]() The 1.2” Static Front is an option for Image Blank binding strips. This gives you a wide wrap on the front of your document to enable you to showcase your brand and design elements.
The 1.2” Static Front is an option for Image Blank binding strips. This gives you a wide wrap on the front of your document to enable you to showcase your brand and design elements.
DO
- Edit and save in CMYK
- Use 300DPI or High Resolution images
- Use Vector graphics
- Convert all text into Graphic Form/Outlines
- Illustrator: Type>Create Outlines
DON’T
- Flatten layers before saving – it’ll reduce your print quality
- Use graphics taken from websites
- Add print or crop marks
Why 300 DPI?
Files such as JPEG, PNG, TIFF etc., are made up of a thousands of tiny ‘dots’ or ‘pixels’. These pixels are all the same size, but can be different colors. The amount of pixels or dots in an image is called ‘resolution’. When there are lots of pixels and an image looks smooth or photographic, that’s ‘high resolution’. When there are less pixels an image often looks blocky and bad.
For this reason, we ask for 300DPI or ‘High Resolution’ graphics – these have a large number of pixels available and will look smooth & precise when printed.
Troubleshooting
1. Paper size: Check that the paper size is set correctly on your printer…since Image Ready use an unusual size, you have to make sure you enter in a custom paper size. If you don’t, the printer will often refuse to print or stop printing mid-page.
>>Paper size for Image Ready: 7.65″ x 13.5″, margins set to 0…if you set margins, that can reduce print area.
2. PDF issue: Are you printing a PDF from a PDF reader like, Acrobat or Preview? If yes, a default setting in most PDF software could be causing problems. Look for “Scale” or “Scale to Fit” or “Actual Size”. Most PDF software, by default, will use a setting like “Scale to Fit” which will automatically shrink the file to a smaller size.
>>Be sure to choose the setting: “Actual Size” or “Custom Scale 100%”.
3. Double check bleeds: Bleed is a printing term that is used to describe a design which has images or backgrounds that touch the edge of the page, extending beyond the trim edge. When a document has bleed, it must be printed on a larger sheet of paper and then trimmed down to actual size.
>>With Image Ready Strip, the trimming is already done, but you still need to print a full bleed. For an 11″ strip, the length of the design should be 11.27″ (that means it has a .1325″ bleed on the top and bottom)…the ink should be printing past the strip edge. Refer to the guides in the downloadable templates.
